
Task Window
To toggle the display of this window:
-
The Task window is enabled by default in your application. You can toggle the display of this window on the Home ribbon by expanding the Show menu, then selecting Task.
The Task window is very similar to the 3D window, but is generally used to display data related to managed reserves generation tasks, as provided by the Reserves ribbon.
The Task window allows managed reserves data to be segregated from other project data.
The input to the reserves workflow is a pit (or pits) and a model (for example, as created by Studio NPVS+), and the output is a reserves table that can be used as an input to the operational scheduling functions available on the Schedule ribbon.
The intermediate data phases are relevant only to reserves generation, and are not stored in your project in the same way as other project files. The Task window allows you to see an uncluttered and context-sensitive display of the data files used during reserves generation.
The Task window has a dedicated Sheets >> Task entry. This means you can use it independently and treat it as a standalone workspace.
Selecting or expanding any item in Sheets >> Task automatically displays the Task window (the same is true for the 3D entry), allowing you to switch quickly between each workspace.
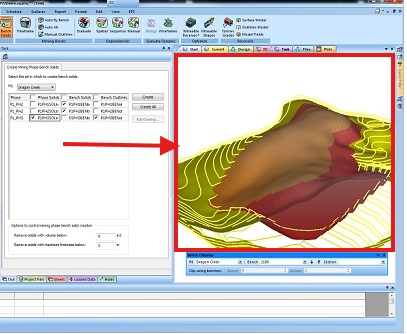
Task window showing Reserves Data control bar, the Reserves ribbon, and a managed Reserves command screen.
This approach provides several benefits. You can format data in the Task window in a way that suits phase and pit data, mining blocks, and block sequences, without applying the same formatting to other project data.
In addition to formatting using the Sheets control bar and the tools in the ribbon system, you can also load data into the Task window using a drag and drop approach, or by using the Data ribbon load options.
Task Window And The Project Files Control Bar
-
Data files created by the managed reserves commands are not added to the general Project Files control bar, but they are visible in the Loaded Data control bar.
-
Data loaded into the Task window is visible as an overlay defined by the default display template for the data type. These overlays are not shared with the 3D window.
-
Data loaded into the 3D window is rendered using the default display template for that data type, and is also made available to the Task window.
This difference in behaviour is intentional. It allows you to choose whether you want data to be shown in both the 3D and Task windows by loading it into the 3D window.
Related topics and activities